

Our group’s story is about a clown who has lost their smile and eventually rediscovers it in the dressing room. To begin the design process, I gathered a range of reference images related to circuses, as well as references specifically focused on circus dressing rooms. I also collected screenshots from The Greatest Showman and It Takes Two to use as visual references for the environment.
Based on these references, I identified several key props that would be important in the dressing room design, including a vanity mirror surrounded by light bulbs, posters, a clothing rack with hanging costumes, a dress form, storage trunks containing performance props, and books. These elements helped establish the atmosphere and functionality of the space.
In addition, I gathered reference images of circus stages. Although designing the stage itself was not required for the project, I initially believed it would be part of the environment and even created a floor plan for it. While this design was ultimately not used, it was still a valuable part of my early exploration and planning process.


I created two different floor plan designs for the dressing room: one with a circular layout and another with a square layout. In both versions, I incorporated the props and furniture mentioned above and experimented with their placement within the space. I also produced several concept sketches to visualize the overall look and atmosphere of the environment.
When arranging the furniture, I intentionally distributed the objects around the room rather than concentrating them in the center. This was done to keep the central area clear, providing sufficient space for character animation and movement while maintaining a functional and visually balanced environment.
These are the two circus stage concept sketches that I created. Although neither of them was ultimately selected for the final project, I carefully developed both designs based on the reference images I had gathered.
Throughout the design process, I paid particular attention to the placement of the stage entrances and the locations of the passageways leading backstage. These elements were important considerations, as they influenced both the functionality of the space and the movement of performers within the environment. As a result, I spent a significant amount of time thinking about how these areas should be arranged while developing the stage designs.


This image is a further refinement of my first circular floor plan design. At this stage, I focused more on developing the atmosphere and color palette of the dressing room. I also added decorative patterns and painted textures to several pieces of furniture and props to give the environment more visual interest and detail.
In my view, the overall color scheme of the room is predominantly warm. Warm colors create a sense of comfort and coziness, which I felt was more suitable for the atmosphere and theme of a circus environment. In this concept illustration, most of the furniture and decorative elements feature warm tones, particularly shades of red, yellow, and brown.
To enrich the visual appearance of the space, I also incorporated small amounts of blue and green as accent colors. These contrasting colors help create a more vibrant and balanced composition, making the circus dressing room feel more visually engaging and colorful.
After completing the environment design work, I also helped my teammates by drawing several shots for the storyboard. I added a number of additional panels to make the overall storyboard flow more smoothly (the sections outlined in red are the ones I contributed). These additions help the audience better understand the story and follow its progression more clearly.
One of the shots I added shows the clown’s smile fading from his face. This was intended to communicate that he is trying to regain his smile by physically manipulating his facial expression, but ultimately fails. I also added two shots showing the clown using adhesive tape to hold a smile in place. These panels were included to clearly demonstrate the method he is attempting and to make his actions and intentions easier for the audience to understand.

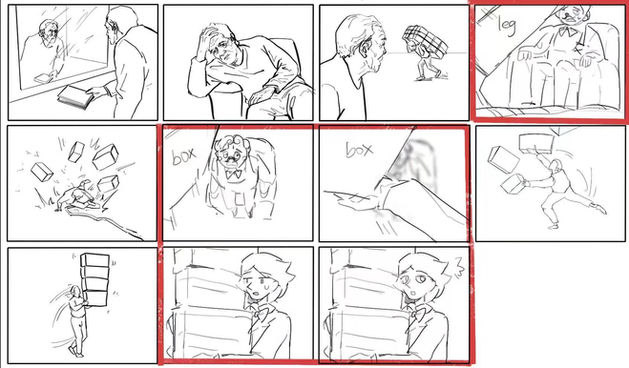
In the next storyboard sequence, I added a close-up shot of a character’s foot. The purpose of this shot was to emphasize the moment when the character trips and falls. Behind this foreground action, I positioned the clown protagonist as a background element, allowing him to remain visible within the scene without distracting from the main focus.
I also illustrated the clown’s surprised facial expression in the same frame. This composition allowed me to communicate two important pieces of information simultaneously: the character’s fall and the clown’s reaction to it. By combining these elements within a single shot, I was able to make the scene more efficient and visually engaging. I feel that the balance between the foreground action and the character’s reaction worked particularly well in this panel.
After the falling character drops the box they are carrying, I added an overhead shot that focuses on the box as it flies through the air in the foreground. At the same time, the clown protagonist can be seen below, looking up at the airborne box with a surprised expression. This shot communicates multiple pieces of information at once, showing both the movement of the box and the clown’s reaction to the unexpected event.
The camera then follows the box into the next shot, where a hand suddenly appears and catches it. In this frame, I used a close-up of the hand to emphasize the action of catching the box. The clown remains visible in the background, but is intentionally blurred because the focus of the shot is the hand and the successful catch.
The following shot transitions to a wider view, revealing that the fallen character has managed to catch all of the boxes. I feel that this sequence of shots makes the scene more dynamic and exciting. The alternation between close-up and wide shots helps create a stronger sense of movement and tension, while also encouraging the audience to stay engaged and continue watching to see what happens next.
After the fallen character successfully catches all of the boxes, I transitioned the scene back to a close-up view and added two close-up shots that focus on the character’s changing facial expressions. I consider this sequence to be a moment of relief following a tense event, allowing the audience to briefly relax after the excitement of the previous action.
The key purpose of these shots is to highlight the character’s shift in attention and emotional reaction. Through the movement of their gaze, the audience can see that the character has noticed something off-screen, followed by a surprised expression. This also serves as foreshadowing for the next event in the story. Immediately after this sequence, the character is struck by the clown horn that has caught their attention.
I believe this addition makes the storytelling more coherent and natural. By showing the character noticing the object before the impact occurs, the transition between events feels smoother and the audience can more easily follow the progression of the scene.

In this storyboard sequence, I added a shot of the fallen character looking upward at the clown horn suspended in the air. I chose this angle because it creates a stronger sense of tension and anticipation, drawing the audience’s attention to the object and emphasizing the potential danger it poses.
The following shot switches to a high-angle view looking down at the character, with the camera gradually moving closer. This shot is designed from the perspective of the clown horn itself, simulating its descent as it falls toward the character’s head. By placing the camera in the object’s point of view, the sequence becomes more dynamic and visually engaging.
I believe this approach makes the scene more interesting and immersive. It allows the audience to experience the moment from a unique perspective, helping them better empathize with the character and feel the tension of the situation as it unfolds.
At the end of the story, I added a shot of the clown who has regained his smile, shown from behind as he faces away from the camera. In this scene, the clown stands with his back toward the audience and faces the exit of the dressing room.
The purpose of this shot is to emphasize his desire and determination to return to the stage. By showing him looking toward the doorway rather than directly at the audience, the scene conveys a sense of purpose and forward movement, suggesting that he is ready to leave the dressing room behind and step back into the spotlight. I feel that this ending shot helps reinforce the character’s emotional journey and provides a satisfying conclusion to the story.

In this section of the storyboard, I revised the opening sequence based on feedback from my teammate. They suggested that the introduction would be more engaging if the camera entered the circus dressing room through the tent curtains before moving toward the main character.
Following this suggestion, I redesigned the opening shots so that the camera begins outside the dressing room and passes through the curtain entrance, gradually revealing the interior space and the character. I then incorporated a camera movement that guides the audience’s attention toward the protagonist.
I believe this change improves the introduction by creating a smoother and more cinematic opening. It not only establishes the setting more effectively but also helps immerse the audience in the environment before introducing the character and the story’s main events.

After completing the storyboard work, I began the 3D modeling process in Blender. One of the first assets I created was the clothing rack for the dressing room.
To model the hanging clothes, I used Blender’s cloth simulation feature to generate more natural folds and fabric movement. Once I was satisfied with the result, I duplicated and adjusted the garments to create variation and fill the rack. This process allowed me to efficiently create the appearance of a clothing rack crowded with costumes, helping to make the dressing room feel more believable and visually detailed.


Next, I modeled the vanity mirror and dressing table in Blender. During this process, I referred to several reference images to ensure that the design matched the style and atmosphere of a circus dressing room.
To make the light bulbs around the mirror appear more realistic, I paid special attention to their materials and construction. I applied a glass material to the outer surface of each bulb and created a filament inside the bulb with an emissive material so that it would glow. This combination helped replicate the appearance of real light bulbs commonly seen in everyday life, making the vanity mirror look more convincing and visually appealing within the scene.
Through these details, I aimed to enhance the realism of the environment while maintaining the warm and theatrical atmosphere of the circus dressing room.
I also created a storage chest in Blender for use within the environment. To develop the design, I gathered reference images of treasure chests from online sources and used them as inspiration. The final model was later placed in the scene as a decorative prop for storing performance items and other accessories.
Since a simple wooden box would have appeared too plain, I incorporated additional design elements based on my reference images. I added a metal frame around the exterior of the chest to make it more visually interesting, as well as a lock on the front and handles on both sides. These details helped give the model a more realistic and refined appearance.
To further enhance the visual appeal of the prop, I used Blender’s cloth simulation feature to create a piece of fabric draped over the chest. This added an extra layer of texture and variation to the scene, helping the environment feel more detailed and preventing it from looking overly simple or repetitive.


I also experimented with creating a teddy bear model in Blender to use as a decorative prop within the environment. My intention was to add more variety and personality to the dressing room by including smaller decorative objects.
To make the teddy bear appear more realistic, I applied a particle system to create a fur effect. However, during the process of transferring assets from Blender to Maya, I discovered that the particle-based fur could not be transferred correctly. As a result, the fur effect was lost when the model was imported into Maya, significantly reducing the visual quality of the asset.
Because of these technical limitations, I ultimately decided not to use the teddy bear model in the final scene. Although it was not included in the finished project, the process helped me better understand the compatibility issues that can arise when moving assets between different 3D software packages.


Next, I redesigned the circus dressing room tent model that had originally been created by one of my teammates. As shown in the images above, the model on the left is the original version created by my teammate, while the model on the right is my revised version.
To improve the appearance and structure of the tent, I used Blender’s cloth simulation feature in combination with a custom-built framework. I first modeled the underlying support structure of the tent and then applied cloth simulation to create the fabric covering. After adjusting the simulation and refining the shape, I was able to achieve a form that more closely resembled a real circus tent.


After revising the tent model created by my teammate, I went on to model several additional props that had been included in the reference layout drawing, including a hat stand, a folding screen, and a wardrobe. These assets were designed to further furnish the dressing room and help create a more complete and believable environment.
Compared to some of the other models I created, these props were relatively straightforward to build. I used basic geometric shapes as a starting point and then modified them through scaling, extrusion, and other modeling techniques to achieve the desired forms. Although these assets were less complex, they played an important role in filling the space and ensuring that the dressing room matched the original concept layout more closely.


After completing the tent model, I began assembling the environment based on the room layout concept created by my teammate. I imported both my own models and the assets created by other team members into the tent scene and carefully adjusted their positions to match the reference layout as closely as possible.
During this process, I focused on arranging the objects in a way that accurately reflected the composition shown in the concept artwork. This helped ensure that the final 3D environment remained consistent with the original design vision while maintaining a natural and believable spatial arrangement.
I also applied materials to the various props and furniture to make them appear more realistic and closer to what they would look like in a finished scene. Adding these materials allowed me to preview the overall visual effect of the environment, evaluate how different assets worked together, and identify any adjustments that might be needed before moving on to later stages of production.


Next, I began refining the materials based on the coloured layout reference created by my teammate. To achieve a closer match to the concept artwork, I gathered a variety of wood texture maps from online resources and applied them to the relevant objects within the scene.
In cases where the textures did not fully match the appearance of the reference image, I adjusted their colours and combined multiple texture elements to create a more suitable result. This process involved colour correction, texture editing, and compositing to ensure that the materials more closely resembled the objects shown in the concept design.


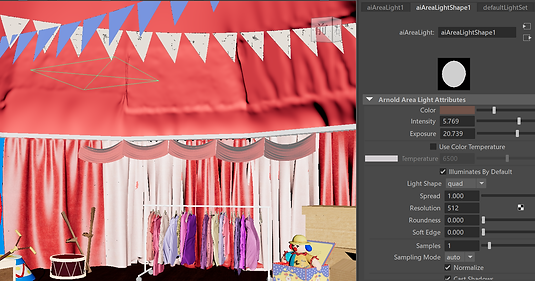

Once the environment was completed in Blender, I exported the scene as an FBX file and imported it into Maya for the final stages of production. During the import process, I encountered some missing file and texture issues, which I resolved by relinking and reorganising the necessary assets.
After the scene was successfully imported, I began adjusting the lighting. I carefully matched the lighting to the coloured reference artwork, using a warm colour palette to recreate the atmosphere shown in the concept images. The warm lighting helped make the environment feel more inviting and comfortable, while also reinforcing the theatrical mood of the circus dressing room.
Through a combination of lighting adjustments and material refinements, I was able to achieve a result that closely resembled the original reference design. The final rendered scene has a strong sense of depth and texture, and I feel that the lighting played an important role in enhancing the overall visual quality and mood of the environment.


After completing the environment modeling, I immediately began working on the animation. However, I encountered a significant problem as soon as I started setting up the shots I was responsible for.
The issue was that the two character models used in the project had a substantial difference in scale after being modified by my teammates. In addition, neither character rig included controls that would allow the overall character size to be adjusted easily. As a result, it was difficult to create believable interactions between the two characters and maintain consistent proportions within the scene. To resolve this issue, I searched for an alternative character model online and selected one whose proportions and height were much closer to those of the clown protagonist.


The animation I created shows a character carrying props walking into the tent, then falling down, and finally turning their head to look toward the camera. During the production of this sequence, I focused on making the movement as smooth and natural as possible.
To achieve better motion flow, I added a large number of keyframes to refine the character’s actions and transitions between poses. This helped improve the timing and continuity of the animation, making the movement feel more fluid and expressive. In addition, I learned how to use parenting relationships in order to keep the prop consistently attached to the character’s hand. By binding the object to the hand bone, the prop could correctly follow the character’s movement throughout the animation. This ensured that the object stayed stable and realistic as the character moved, without requiring constant manual adjustment.

To make the shot follow the character, I also animated the camera by setting keyframes. This allowed the camera to move in sync with the character throughout the scene, ensuring that the framing consistently tracked the action.

After rendering all the frames, I imported the image sequence into Blender and assembled them into a video sequence. This allowed me to compile the individual frames into a continuous animation.
Once the footage was properly sequenced and checked, I completed the final video output. This marked the completion of my animation production process.